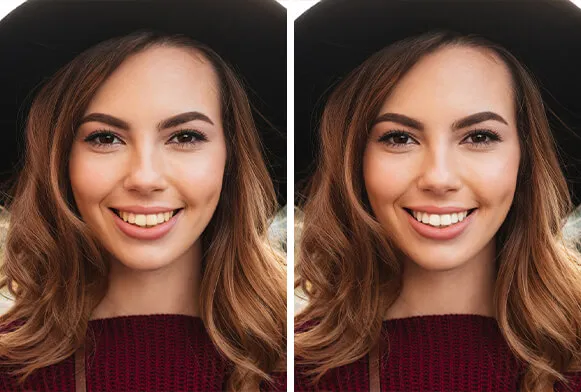
What is Photoshop Teeth Whitening
Photoshop teeth whitening is a digital technique used to enhance the appearance of teeth in photographs. It involves using various tools and adjustments within Adobe Photoshop to lighten the shade of teeth, remove discoloration, and create a brighter, more appealing smile. This process is widely used in portrait photography, commercial imagery, and even personal photo editing to achieve a flawless look. It’s a popular technique because it offers a quick and effective way to improve smiles without resorting to physical dental procedures, and it’s a non-invasive method to enhance the visual appeal of a photograph. By carefully adjusting the colors and tones, you can achieve natural-looking results that blend seamlessly with the rest of the image.
Why Photoshop for Teeth Whitening
Photoshop provides unparalleled control and precision for teeth whitening compared to other editing software or simpler tools. The software’s advanced features allow you to make detailed adjustments to specific areas of the image, ensuring a realistic outcome. With its powerful selection tools, you can isolate the teeth with accuracy, avoiding unwanted changes to the surrounding areas like gums or skin. Furthermore, Photoshop offers a wide range of adjustment layers and blending modes that allow for non-destructive editing, meaning you can experiment with different techniques without permanently altering the original image. Its comprehensive color correction capabilities allow you to fine-tune the shade and hue, making the teeth look naturally white instead of overly processed. The versatility of Photoshop makes it the preferred choice for professional photographers and editors.
Step 1 Open and Prepare the Image

Begin by opening the image in Adobe Photoshop. Ensure the image is high-resolution for the best results. It’s crucial to duplicate the original layer to preserve the original image, which allows for non-destructive editing. To do this, right-click on the background layer in the Layers panel and select ‘Duplicate Layer.’ This process ensures that any adjustments made will be applied to the duplicated layer, leaving the original image untouched. You can then rename this duplicated layer to something descriptive, like ‘Teeth Whitening,’ to keep your workflow organized. This initial step is vital because it protects the original image, allowing you to go back and undo any changes if necessary or re-adjust the process without starting over. Always make sure the image is properly exposed and has good overall color balance before proceeding, as these factors will affect the final results.
Step 2 Selecting the Teeth
The next critical step is selecting the teeth with precision. There are several tools in Photoshop that you can use to achieve this. The ‘Lasso Tool’ allows for freehand selection, ideal for roughly outlining the teeth. The ‘Polygonal Lasso Tool’ is great for making straight-edged selections. For more accuracy, the ‘Pen Tool’ offers the most control, allowing you to create precise paths around the teeth. Once you’ve selected the teeth, refine the selection by adjusting the edges using ‘Select and Mask.’ This feature enables you to smooth the edges, feather the selection, and adjust the contrast to create a more natural look. Be careful to avoid selecting the gums; this step ensures that the adjustments are applied only to the teeth and helps prevent any unnatural effects.
Techniques for Precise Selection
To get the most accurate selection, zoom in closely on the teeth. Use a small brush size if using the Lasso or Pen Tool. When using ‘Select and Mask,’ experiment with the ‘Smooth,’ ‘Feather,’ and ‘Contrast’ sliders to achieve a seamless transition between the teeth and the surrounding areas. If you accidentally select too much or too little, use the ‘Add to Selection’ or ‘Subtract from Selection’ options to refine your selection. Consider the lighting in the image and adjust your selection accordingly, as shadows and highlights can impact how the selection tool works. Taking your time during this step is crucial because a well-defined selection is the foundation for achieving natural-looking teeth whitening.
Step 3 Adjusting Brightness and Contrast

Once the teeth are selected, the next step is to adjust their brightness and contrast. Go to ‘Image’ > ‘Adjustments’ and choose either ‘Brightness/Contrast’ or ‘Levels.’ Using ‘Brightness/Contrast,’ you can simply increase the brightness to lighten the teeth. However, this method might not always look natural, so the ‘Levels’ adjustment is often preferred because it offers more control. With ‘Levels,’ you can adjust the shadows, midtones, and highlights to fine-tune the brightness and contrast. Adjust the white point slider to brighten the teeth and the black point slider to add contrast. Be mindful not to overdo the adjustments, as this can lead to an unnatural appearance.
Fine-Tuning Brightness and Contrast
To make the adjustments more precise, use a layer mask. This allows you to selectively apply the brightness and contrast adjustments only to the selected teeth. After applying the adjustments, click on the layer mask icon (the white rectangle next to the adjustment layer) in the Layers panel. Use a soft, black brush to paint over any areas where the adjustment is too strong, and use a white brush to bring the adjustment back in areas where it is too weak. This helps blend the whitening effect seamlessly into the rest of the image. Monitor the changes closely and make gradual adjustments, reviewing the overall effect to avoid making the teeth look artificial.
Step 4 Using Hue and Saturation
Adjusting the hue and saturation is essential for a natural-looking whitening effect. Navigate to ‘Image’ > ‘Adjustments’ and select ‘Hue/Saturation.’ In the ‘Hue/Saturation’ panel, you can adjust the color and intensity of the teeth. Reducing the saturation will remove yellow or brown tones, making the teeth appear whiter. Be very cautious; over-decreasing the saturation can make the teeth look gray. You might also need to slightly adjust the hue to correct any unnatural color casts. This often involves slightly shifting the hue towards a more natural white shade. It is also possible to use a ‘Color Balance’ adjustment layer to further refine the color of the teeth, focusing on removing any unwanted yellow or orange tones that might remain after the initial adjustments.
Color Correction for Natural Look

The key to natural-looking teeth whitening is subtle color correction. Use the ‘Hue/Saturation’ and ‘Color Balance’ adjustments in small increments to achieve a balanced white color. Consider the surrounding skin tones and other elements in the image when making color adjustments. If the skin has warm tones, a slight touch of warmth in the teeth can help them blend better. Use the layer mask on your ‘Hue/Saturation’ and ‘Color Balance’ adjustment layers to refine the areas of the teeth affected by the color changes. This way, you can maintain the natural color variation within the teeth, avoiding a flat, uniform look.
Step 5 Refining and Finishing Touches
After adjusting the brightness, contrast, hue, and saturation, refine the edges and blend the changes. Use the ‘Blur’ filter, found under ‘Filter’ > ‘Blur,’ to soften any harsh edges around the teeth. A small amount of blur helps the teeth blend naturally with the gums. Also, use the ‘Smudge Tool’ to gently blend the areas around the teeth where the adjustments were made. This creates a more seamless transition between the whitened teeth and the surrounding areas. Examine the image closely to identify any unnatural-looking artifacts or imperfections and correct them with the ‘Clone Stamp Tool’ or ‘Healing Brush Tool.’ These tools can remove any remaining blemishes or irregularities, further improving the overall look of the teeth and the image.
Smoothing and Blending Techniques
For smoothing and blending, start with a small brush size for the blur or smudge tool. A soft brush is essential to avoid creating hard lines. Apply the blur and smudge tools sparingly, observing the results closely to avoid over-processing. If you encounter any issues, use the undo function or adjust the opacity of the adjustment layer to soften the effect. Blend the changes with the underlying layer by adjusting the blending mode of the adjustment layers. Using the ‘Overlay’ or ‘Soft Light’ blending modes can help to create a natural look. The goal is to have a final result where the teeth look brighter and more attractive but still retain a natural appearance. If the whitening effect still looks artificial, revisit the earlier steps and make further adjustments until the desired outcome is achieved.
Final Steps and Saving Your Work

Once you’ve completed all the adjustments, carefully review the entire image to ensure that the teeth whitening looks natural and does not clash with the rest of the image. Zoom in and inspect the details, paying attention to the edges of the teeth and any potential artifacts. Save your work by going to ‘File’ > ‘Save As’ and choose a suitable format such as JPEG or TIFF for the final image. When saving as a JPEG, select a high-quality setting to preserve the details and avoid compression artifacts. Always keep the original, unedited image as a backup in case you need to revert to it. Also, it’s good practice to save a layered PSD file, which allows you to make further edits later. This comprehensive approach ensures that your teeth whitening results are both effective and visually appealing, enhancing the overall quality of your photographs.